Developing a JUnit Monitoring Test
Abstract
This example shows a JUnit Test that executes a DNS query to resolve a hostname of a domain. In addition, the received IP V4 address is verified. You can use this example to verify that a DNS hostname is currently defined and pointing to the correct IP V4 address.
If you scroll through the code below, you will notice that the Java class is not part of a Java Package and extends AbstractJUnitTest, and that there is small code at @Before and @After. This is necessary so that the JUnit test can run on the RealLoad infrastructure.
The code at @Test corresponds to a normally programmed JUnit test, with the only exception that a special logger is used (class MemoryLogAdapter, method log.message).
To compile the code, the JAR files com.dkfqs.tools.jar and junit-4.13.2.jar are required. The Java Doc of com.dkfqs.tools is published at https://download.realload.com
A simple test case was deliberately chosen so that you can become familiar with the RealLoad product. We recommend that you carry out the steps described here yourself. After you know how to get a JUnit test running, you can create any JUnit test yourself, or migrate existing JUnit tests to RealLoad - simply by replacing the @Test method of this example.
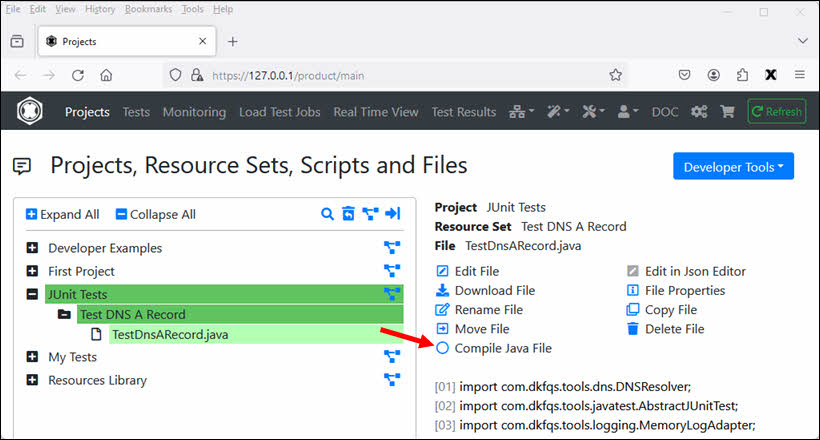
1. Create the File TestDnsARecord.java in the Project Tree
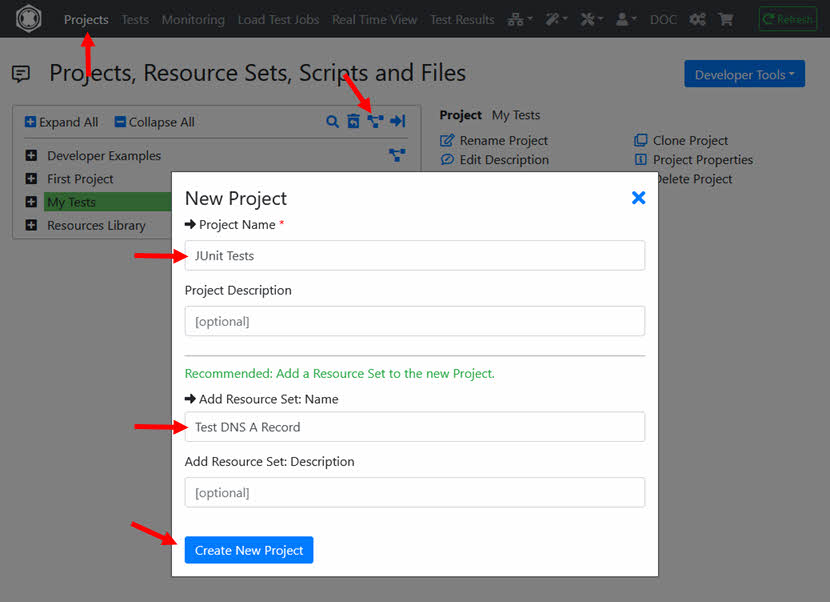
You must first create an empty file named TestDnsARecord.java in a Project’s ‘Resource Set’. ‘Resource Sets’ are something like sub-directories of a project, which contain all the files necessary to define and execute a test. New Projects and Resource Sets can be created in the Projects Menu.
Create a new Project and Resource Set: JUnit Tests / Test DNS A Record.
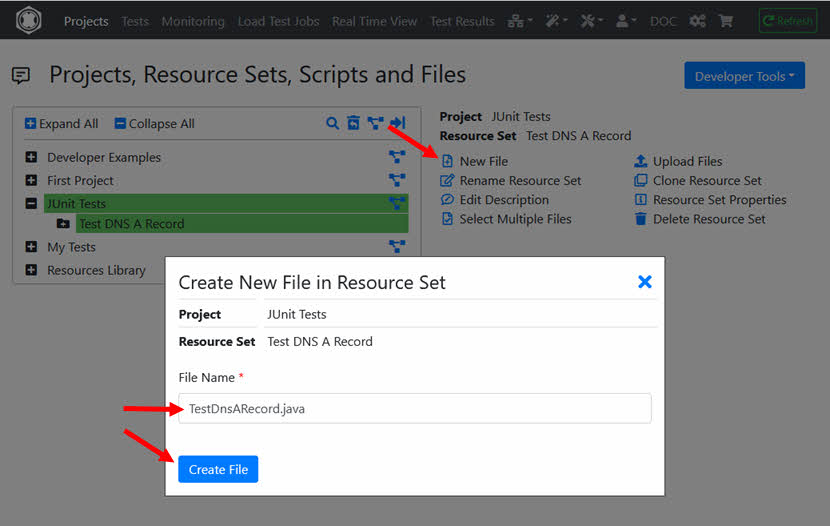
Create a new (empty) file: TestDnsARecord.java in the Resource Set.
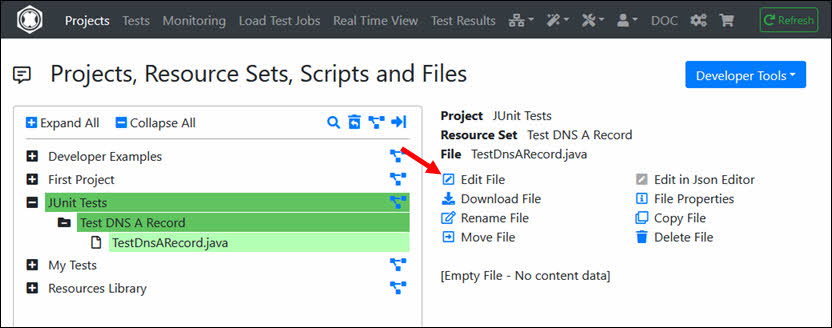
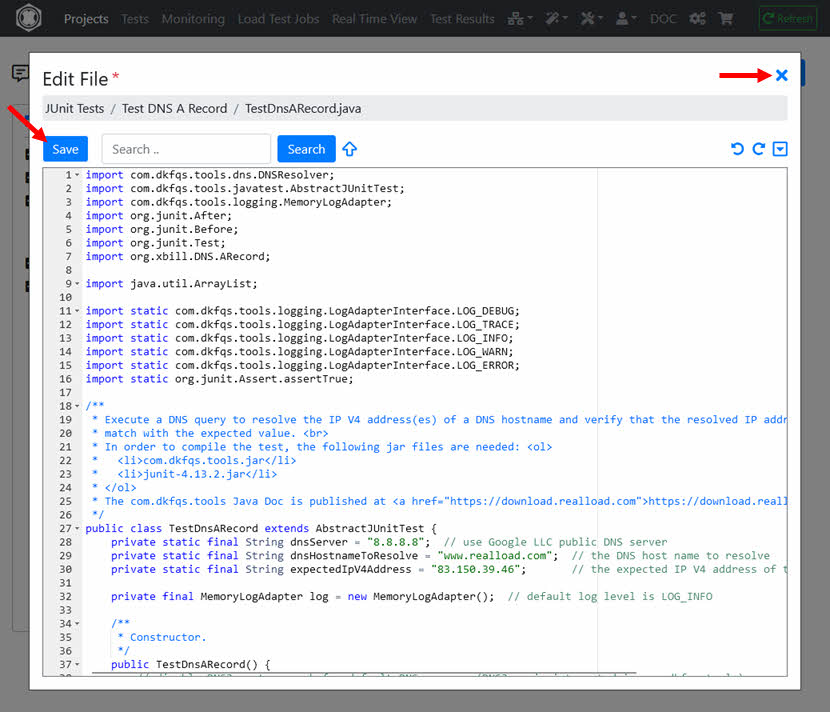
After the empty file has been created, click on ‘Edit File’ and paste the source code shown above into the editor.
Then save the file and close the editor.
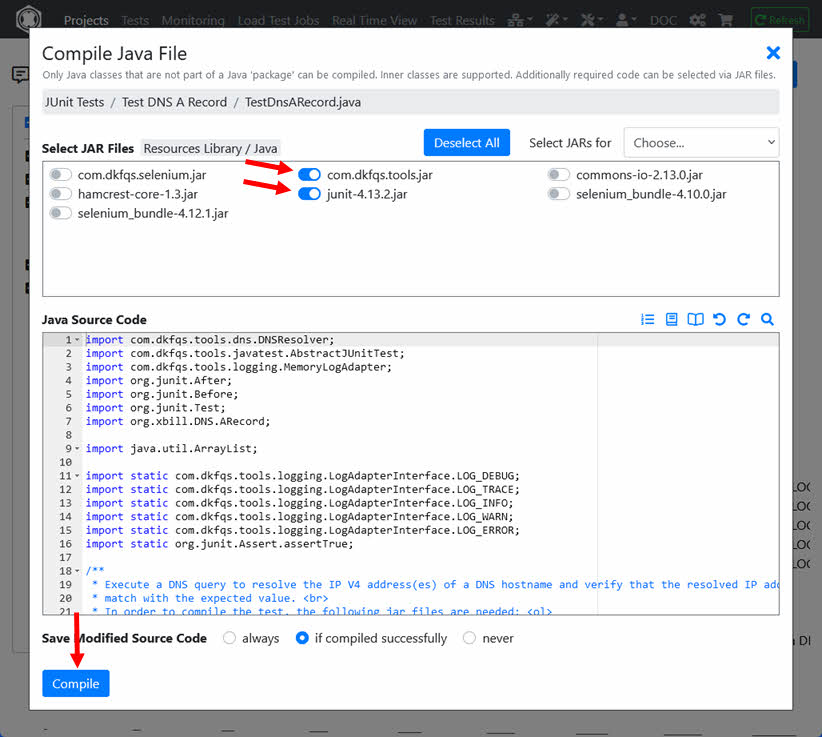
2. Compile the TestDnsARecord.java File and Define the RealLoad ‘Test’
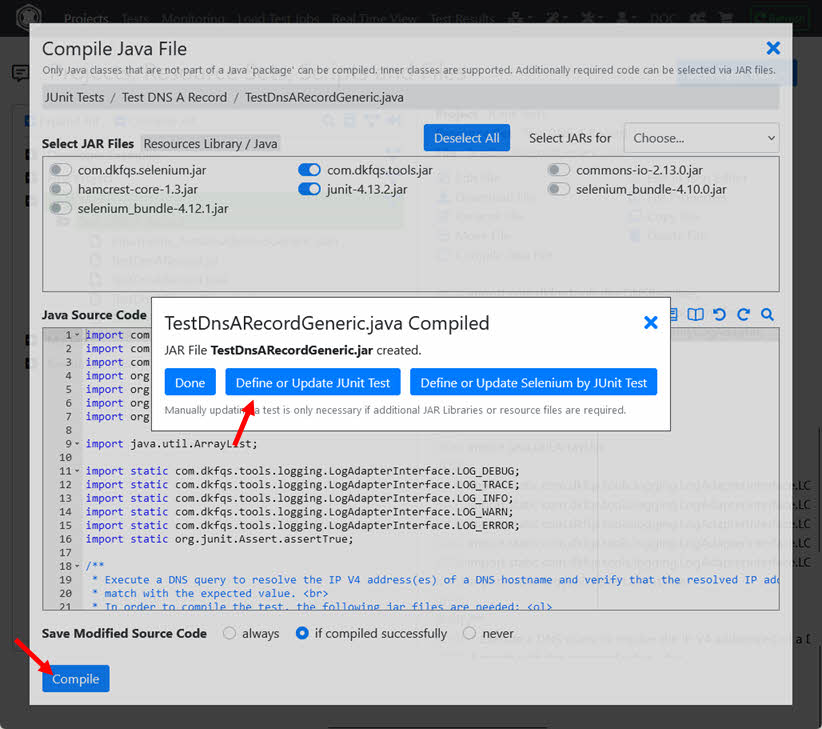
Click on the ‘Compile Java File’ icon.
Select the JAR files com.dkfqs.tools.jar and junit-4.13.2.jar and click the ‘Compile’ button.
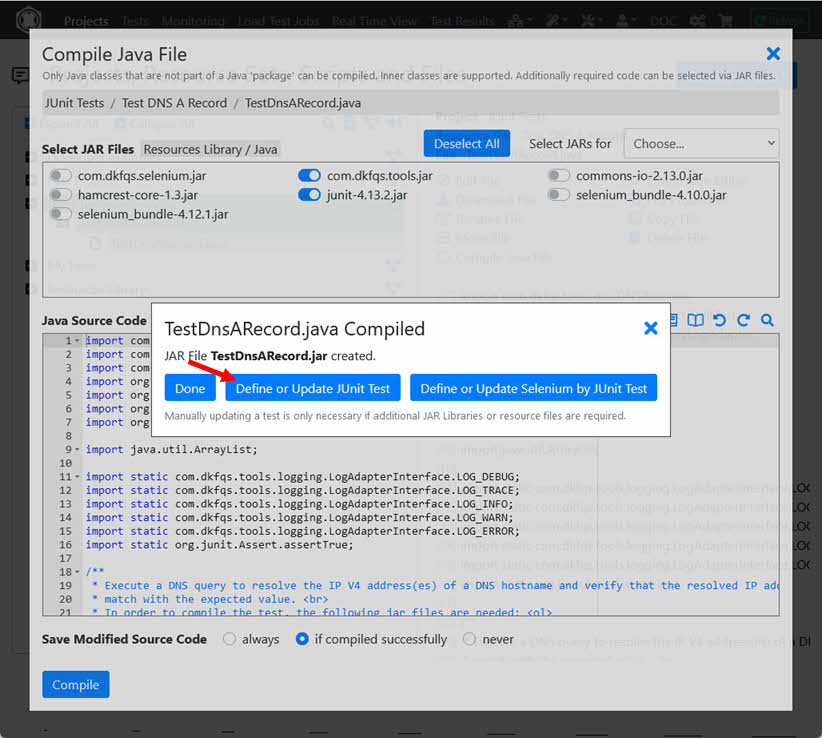
After the file has been successfully compiled click on ‘Define or Update JUnit Test’.
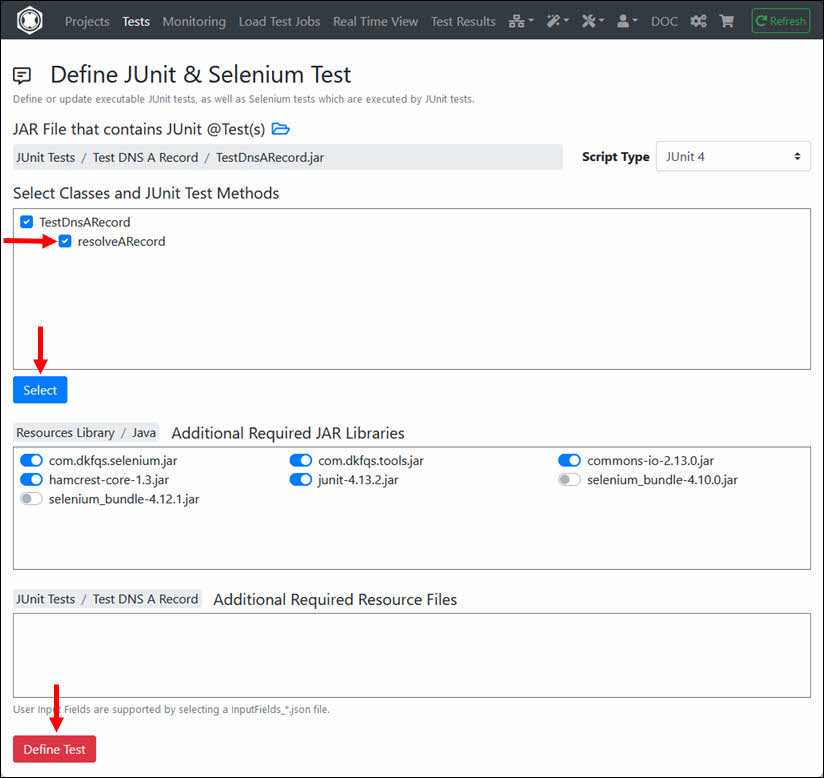
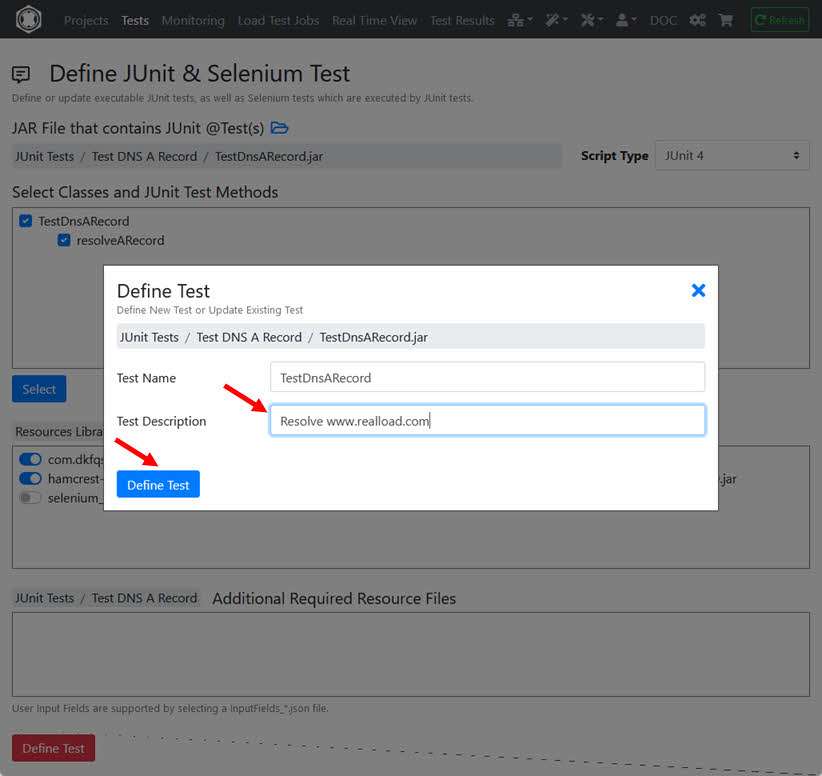
Select the @Test method (in this case resolveARecord) and click ‘Select’. Leave the switches at ‘Additional Required JAR Libraries’ as shown (default setting) and then click on ‘Define Test’.
Enter the ‘Test Description’ and click on ‘Define Test’.
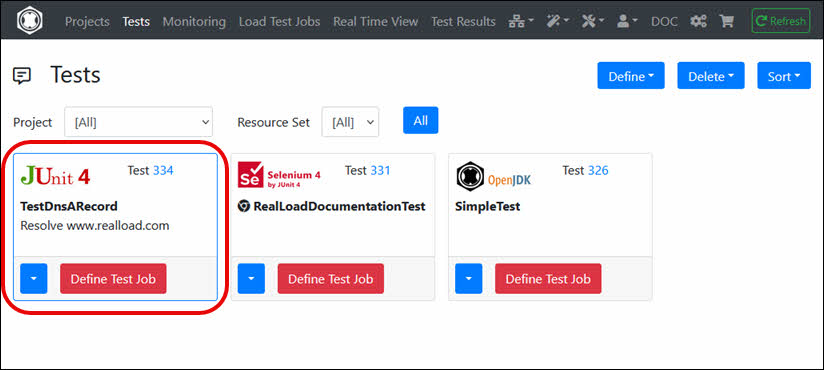
The RealLoad ‘Test’ is now defined. From here you can now create both a Load Test Job and a Monitoring Job.
Note about RealLoad 'Tests'
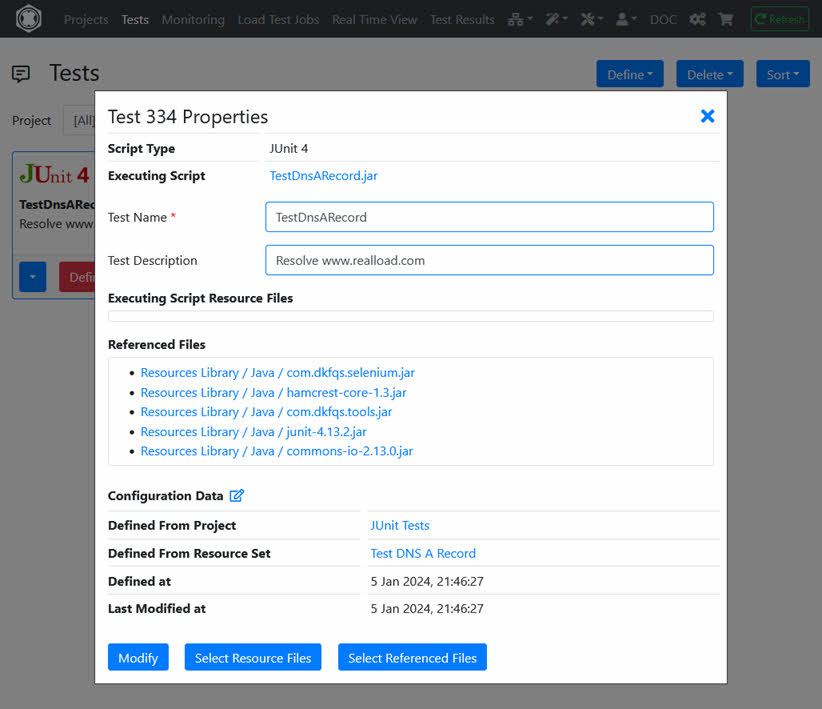
Note that a RealLoad ‘Test’ is just a shell that contains pointers to the required files. This means that if a resource file or a referenced file of a test is changed, the test is also changed.
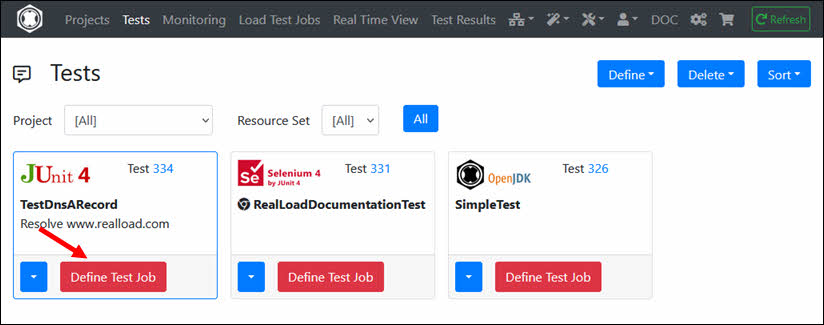
3. Verify the Test
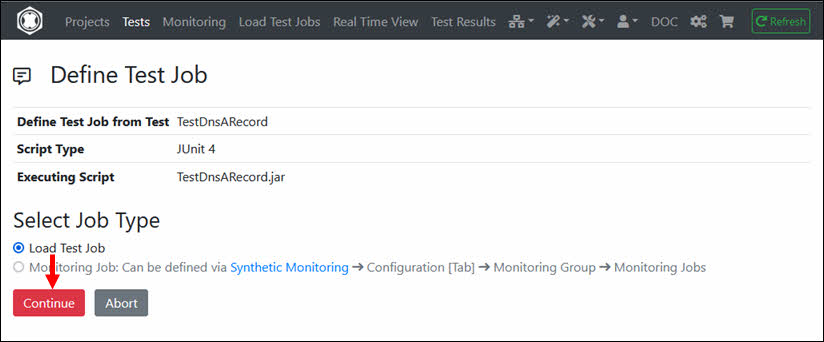
To verify that the test works correctly, first start it as a Load Test Job with only one simulated user and one loop. Click ‘Define Test Job’.
Click ‘Continue’.
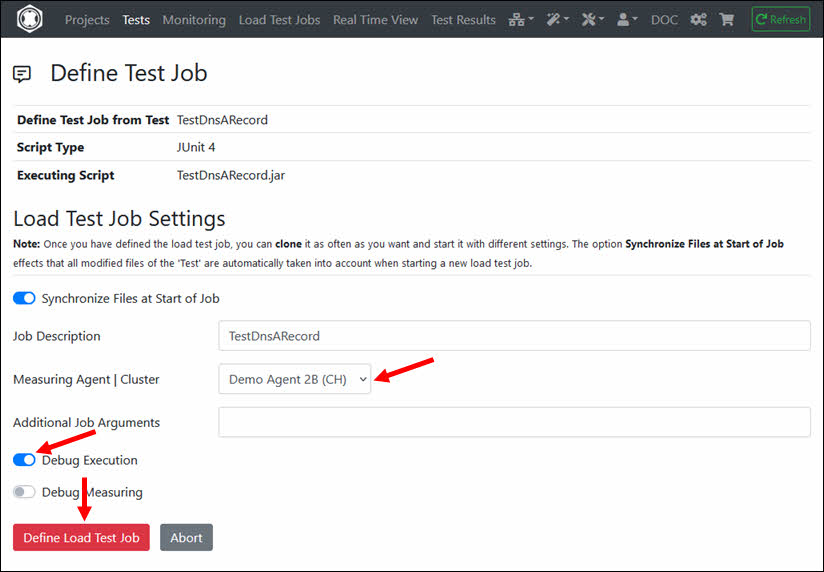
Select the Measuring Agent on which the Load Test Job will be executed and turn on the switch ‘Debug Execution’. Then click on ‘Define Load Test Job’.
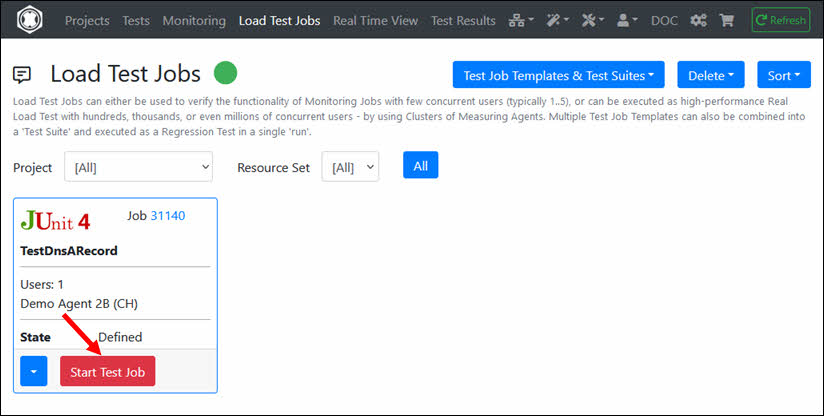
The Load Test Job is then created and in the state ‘Defined’. Click on ‘Start Test Job’.
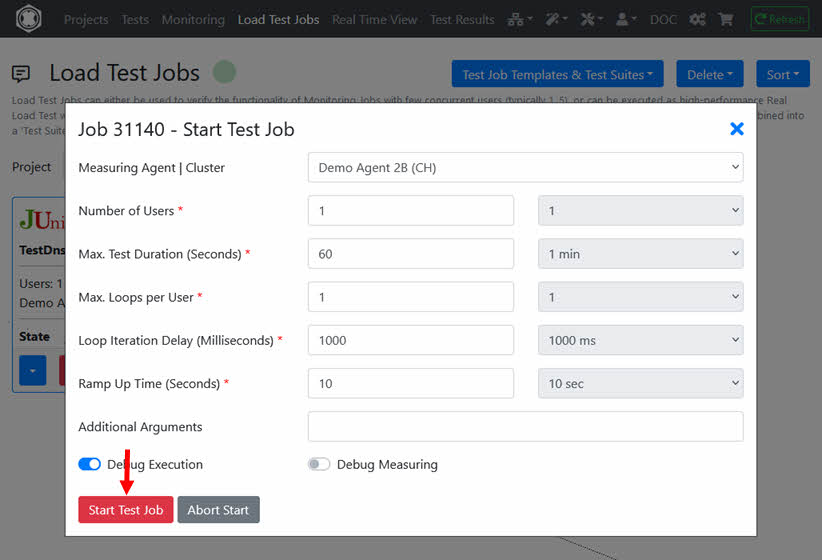
The settings of the Load Test Job are displayed, which can also be modified here (not necessary in this case). Click ‘Start Test Job’.
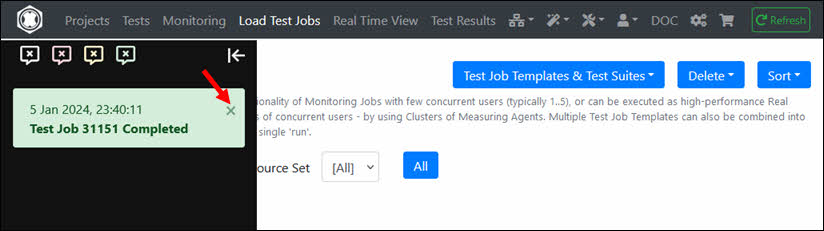
Wait a few seconds until you receive the notification that the Load Test Job has completed. Then delete the notification.
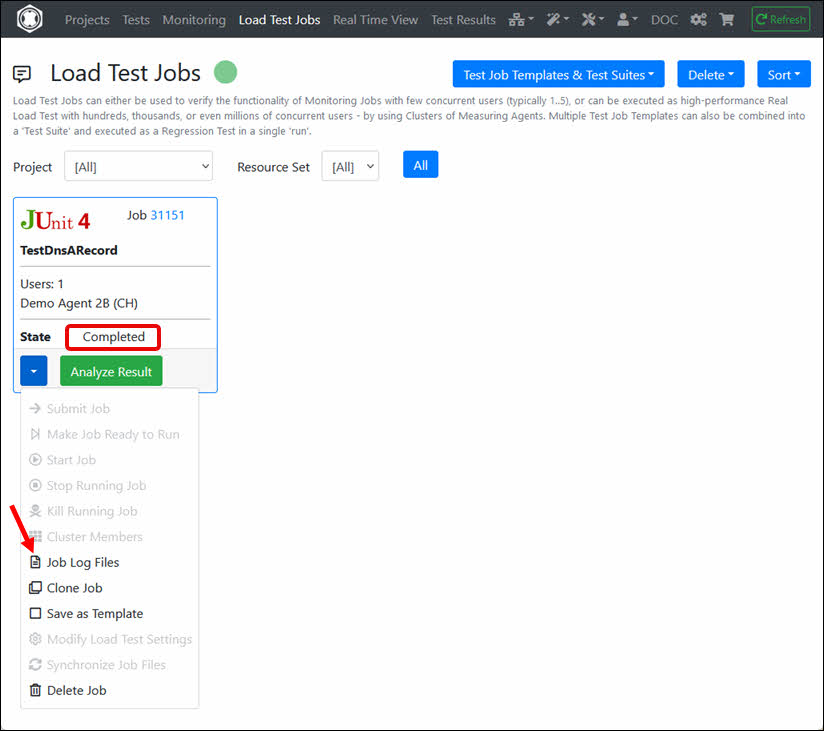
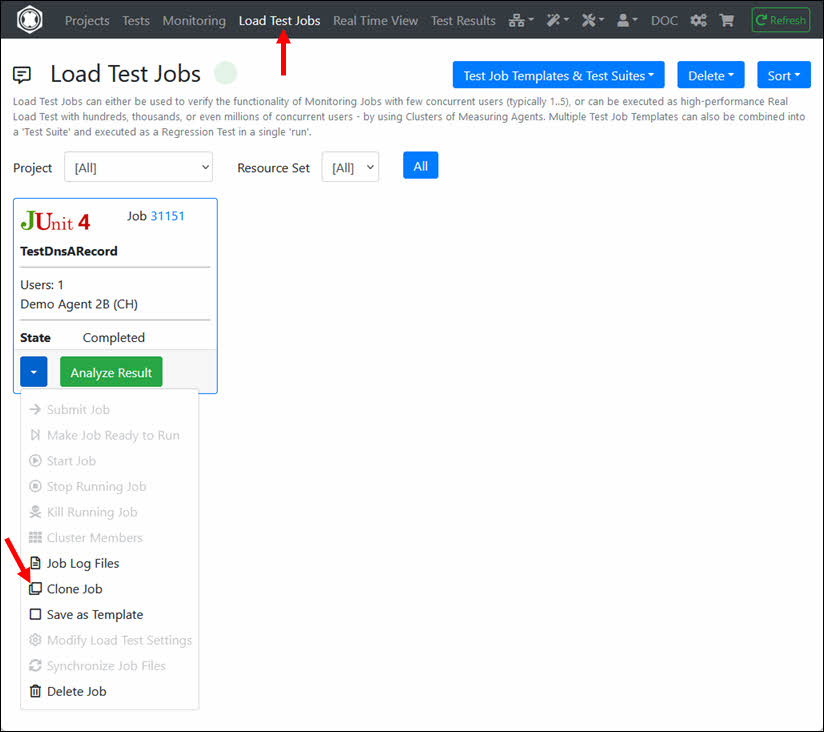
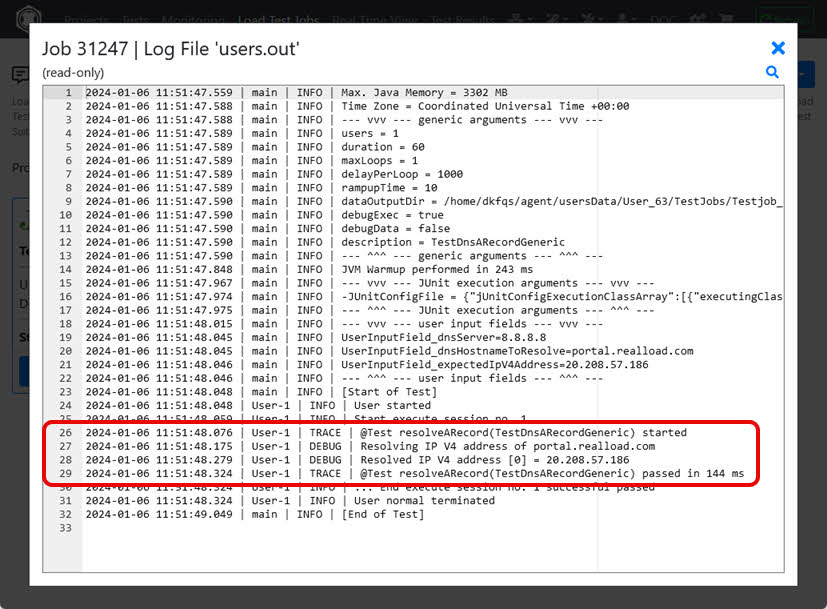
From the Load Test Job drop-down menu, select ‘Job Log Files’.
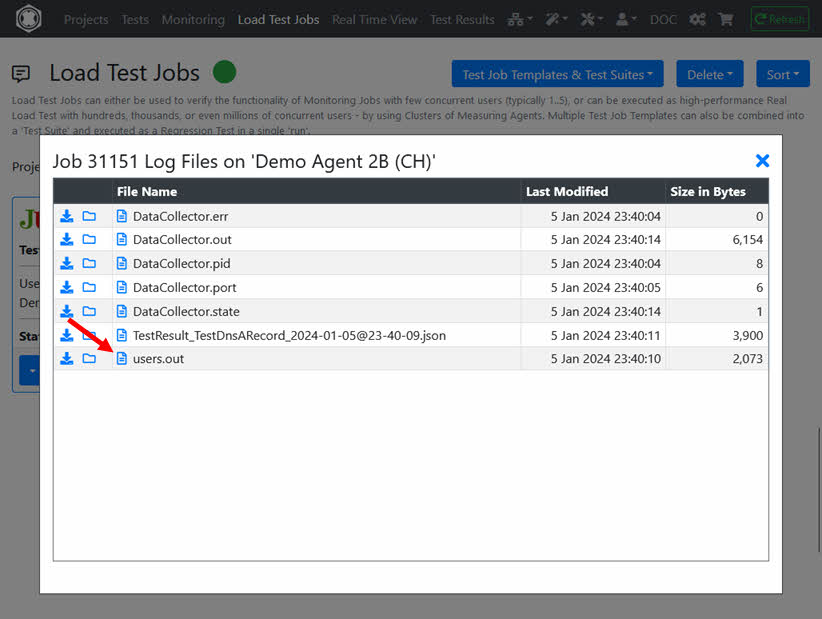
Select the Job Log File ‘users.out’.
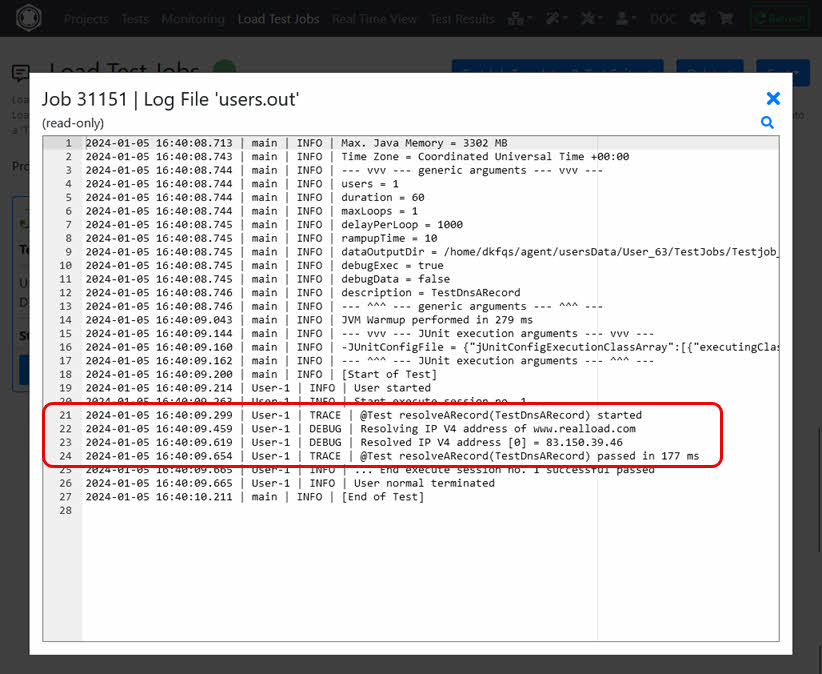
If no error or Java stack trace is displayed, the Load Test Job was executed successfully.
4. Troubleshooting a Test
If the job log file users.out shows an error, you need to modify the Java code of the test, or you need to add additional JAR files required to run the test. After editing the Java code, compile the Java file again and then click the ‘Define or Update JUnit Test’ button after successful compilation. Then jump directly into the Load Test Jobs menu, ‘clone’ the Load Test Job and run it again.
5. Define the Monitoring Job
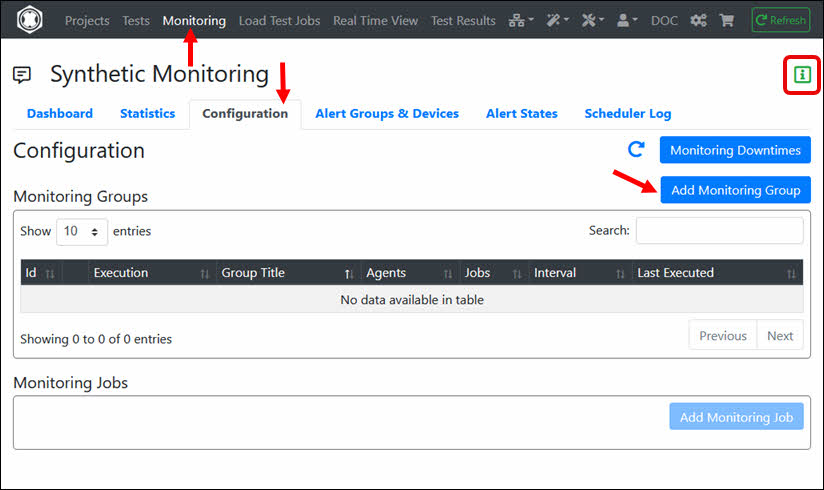
If this is your first Monitoring Job, you must first create a ‘Monitoring Group’. Navigate to Monitoring, click the ‘Configuration’ tab and then click ‘Add Monitoring Group’. Note: There is also separate help for monitoring.
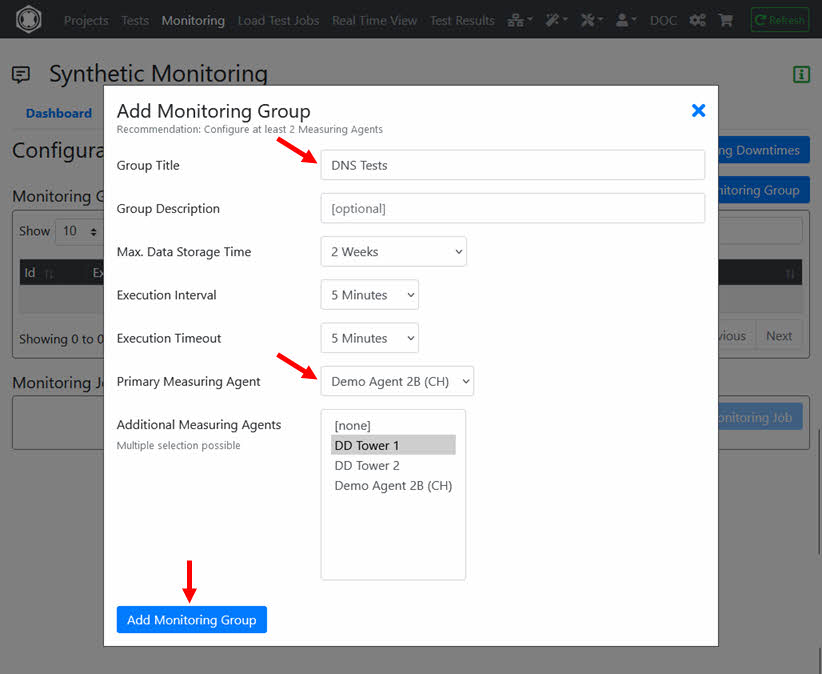
Enter the ‘Group Title’ and select at least one ‘Measuring Agent’ on which the Monitoring Job(s) will be executed. Then click ‘Add Monitoring Group’.
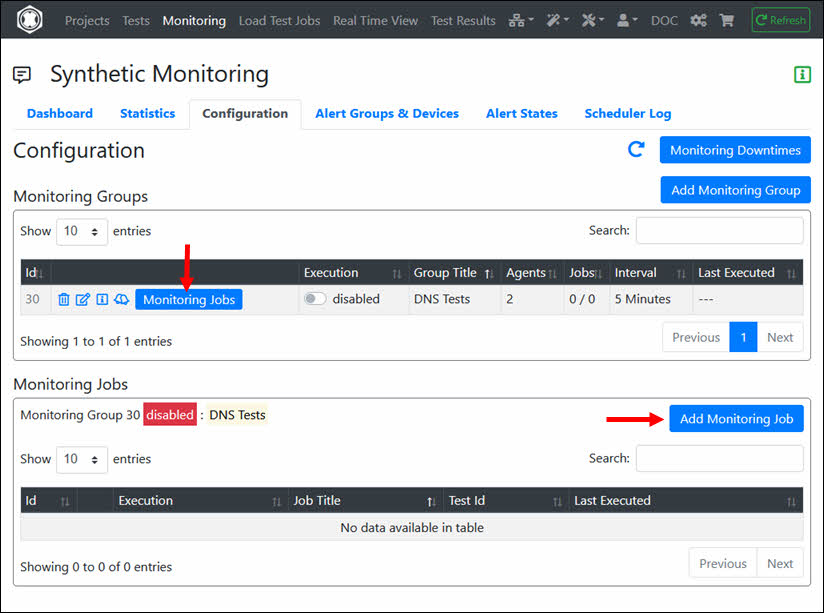
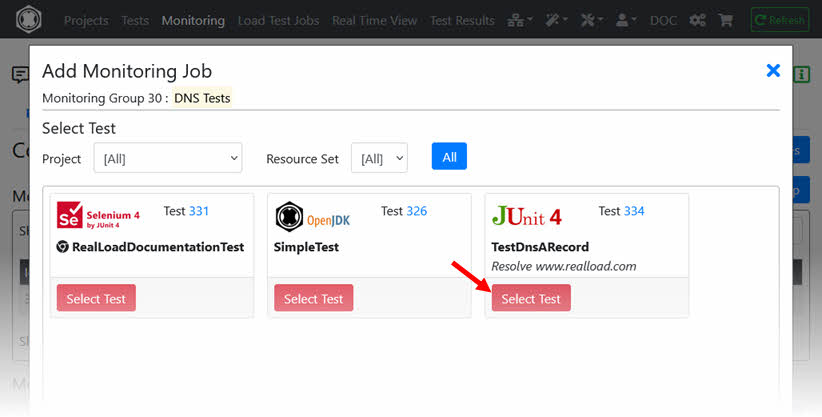
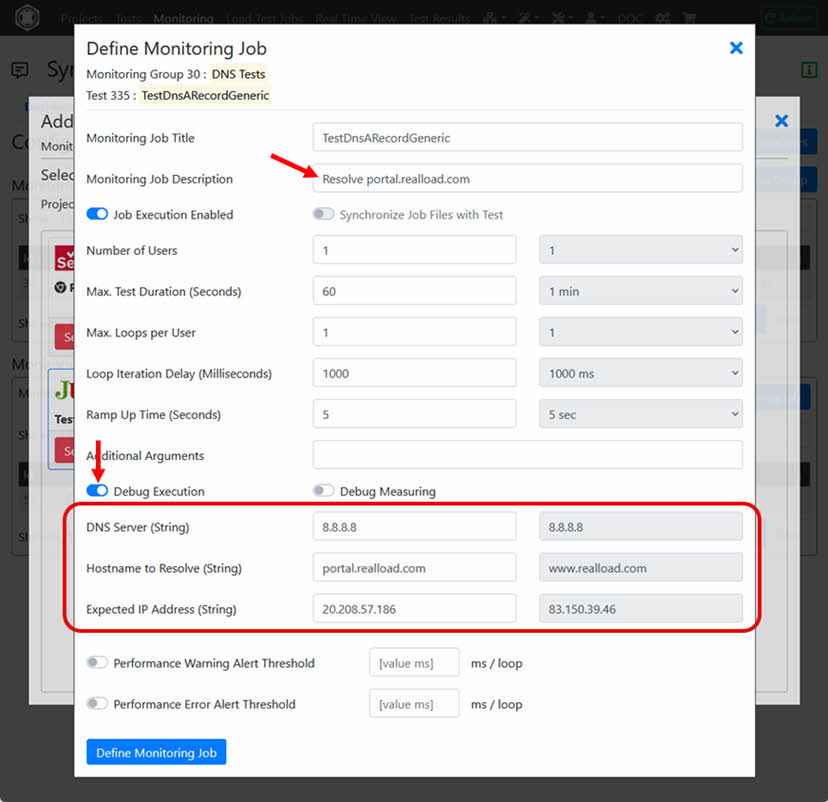
In the ‘Monitoring Group’ click ‘Monitoring Jobs’ and then click ‘Add Monitoring Job’.
Select the ‘Test’ of the Monitoring Job.
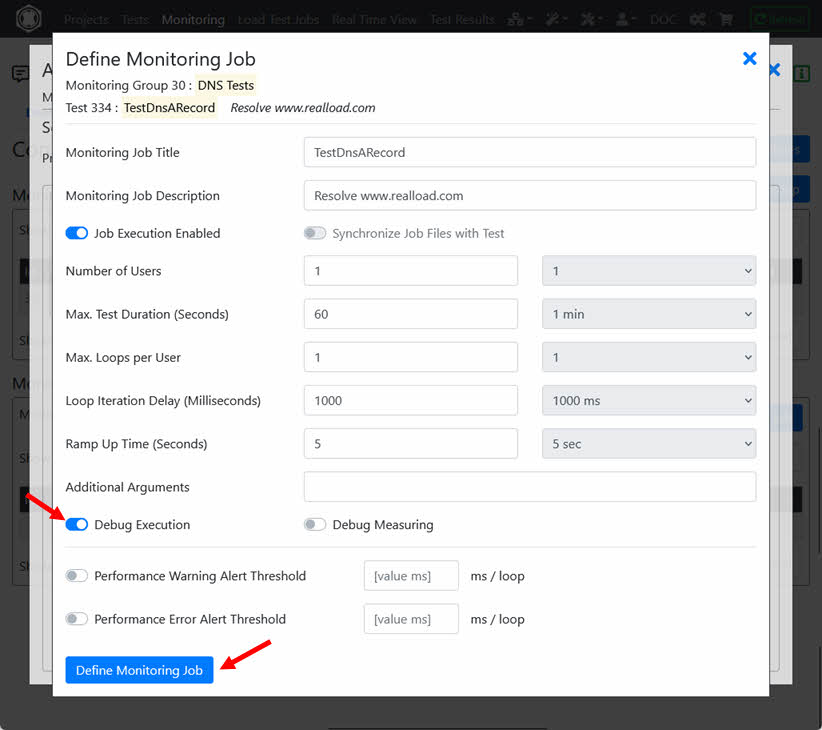
Turn on the switch ‘Debug Execution’ and click ‘Define Monitoring Job’.
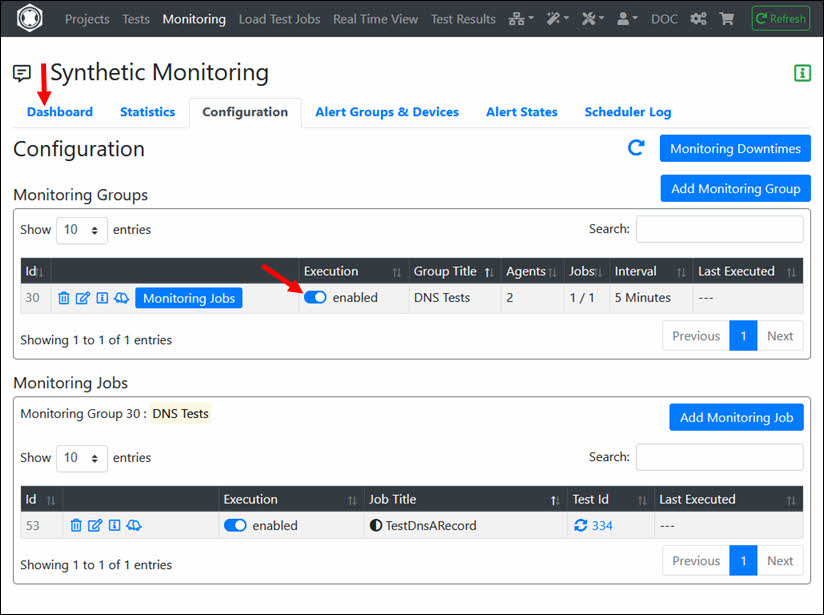
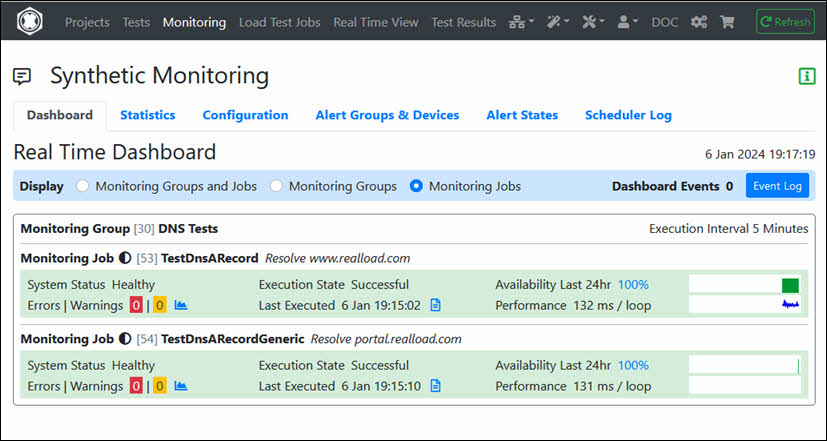
Enable the execution of the Monitoring Group and navigate to ‘Dashboard’.
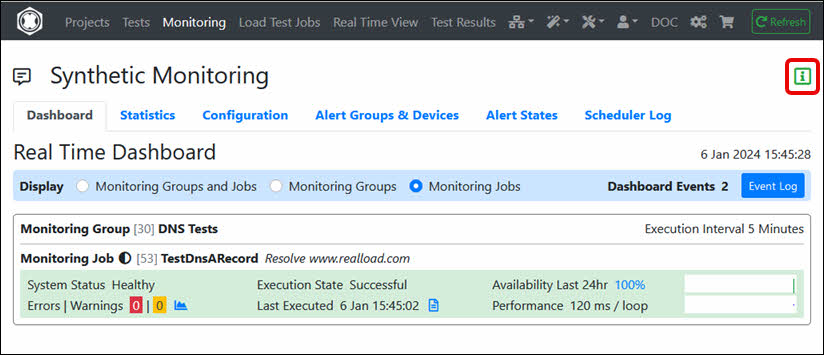
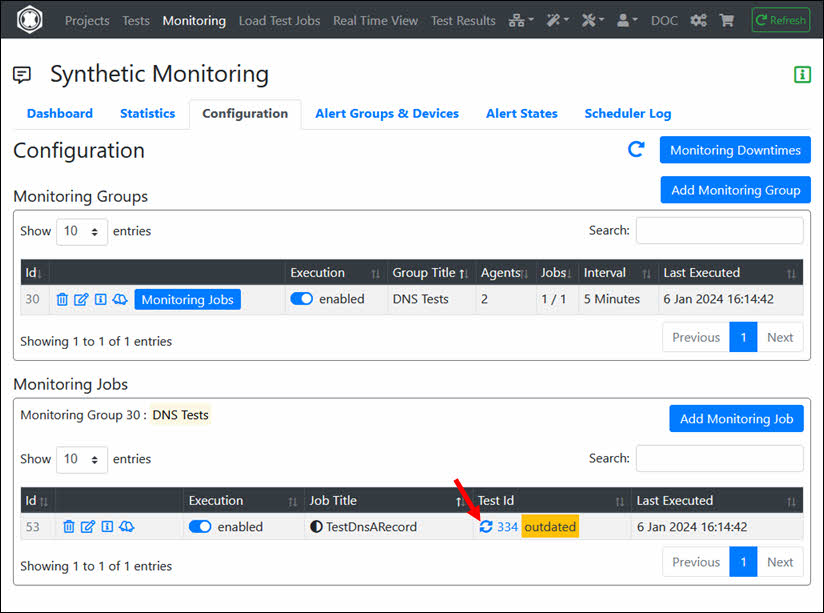
The Monitoring Job is now defined and will be executed periodically. For additional help configuring monitoring (e.g. adding ‘Alert Devices’), see Monitoring Help.
Hint
If you modify the ‘Test’, the corresponding Monitoring Job is not automatically updated to avoid unexpected corruption of the Monitoring Job. After you have verified the modified ‘Test’ by running a small Load Test Job, you must manually update the Monitoring Job.
6. Optional: Create a Generic DNS A-Record Test
As you saw in the code before, the following 3 variables are defined as constants:
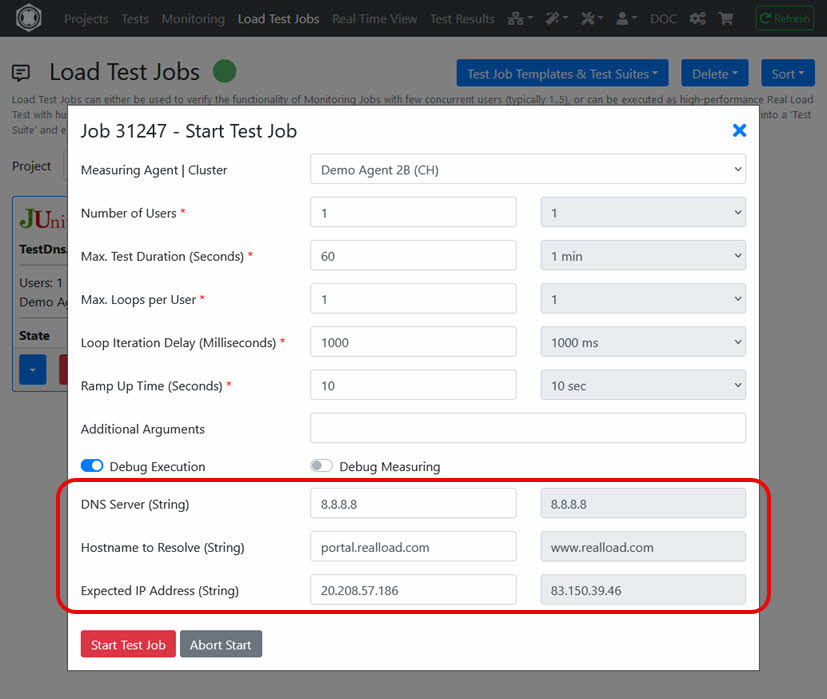
private static final String dnsServer = "8.8.8.8";  // use Google LLC public DNS server
private static final String dnsHostnameToResolve = "www.realload.com";  // the DNS host name to resolve
private static final String expectedIpV4Address = "83.150.39.46";       // the expected IP V4 address of the resolved host name
This section now describes how you can dynamically initialize these variables using User Input Fields.
The ‘User Input Fields’ values can be entered when starting a Load Test Job and when defining a Monitoring Job. This makes the test reusable, i.e. you can add the same ‘Test’ multiple times to multiple Monitoring Jobs, but use different values for the ‘User Input Fields’ for each Monitoring Job.
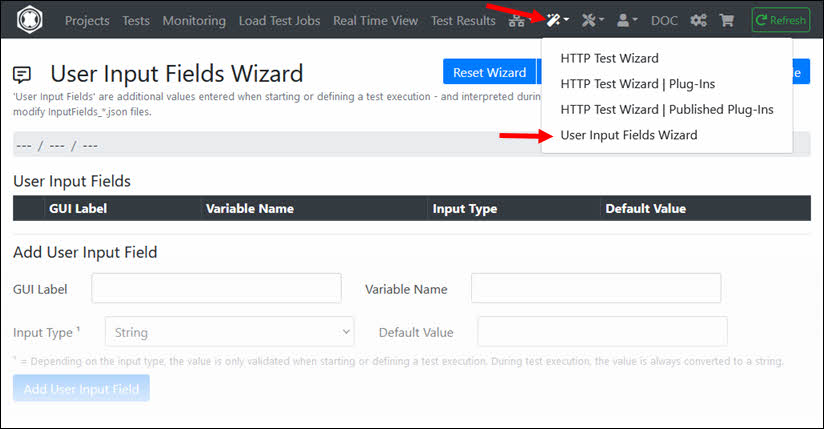
First you have to create a file that contains the definitions of the User Input Fields. To do this, invoke the User Input Fields Wizard.
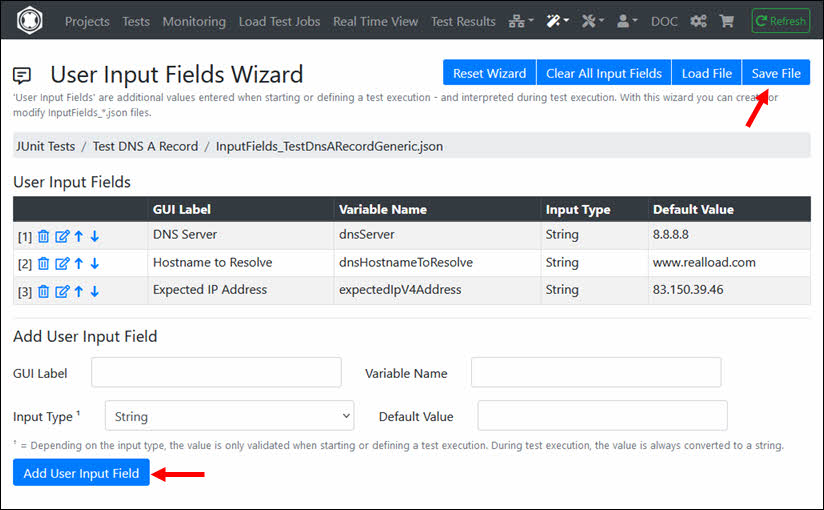
Enter (add) the 3 User Input Fields and save the file at JUnit Tests / Test DNS A Record / InputFields_TestDnsARecordGeneric.json
| GUI Label | Variable Name | Input Type | Default Value |
|---|---|---|---|
| DNS Server | dnsServer | String | 8.8.8.8 |
| Hostname to Resolve | dnsHostnameToResolve | String | www.realload.com |
| Expected IP Address | expectedIpV4Address | String | 83.150.39.46 |
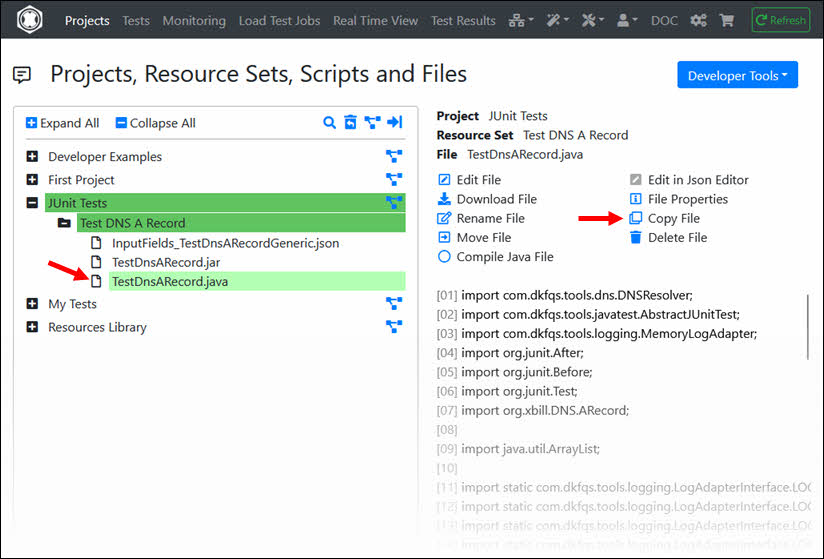
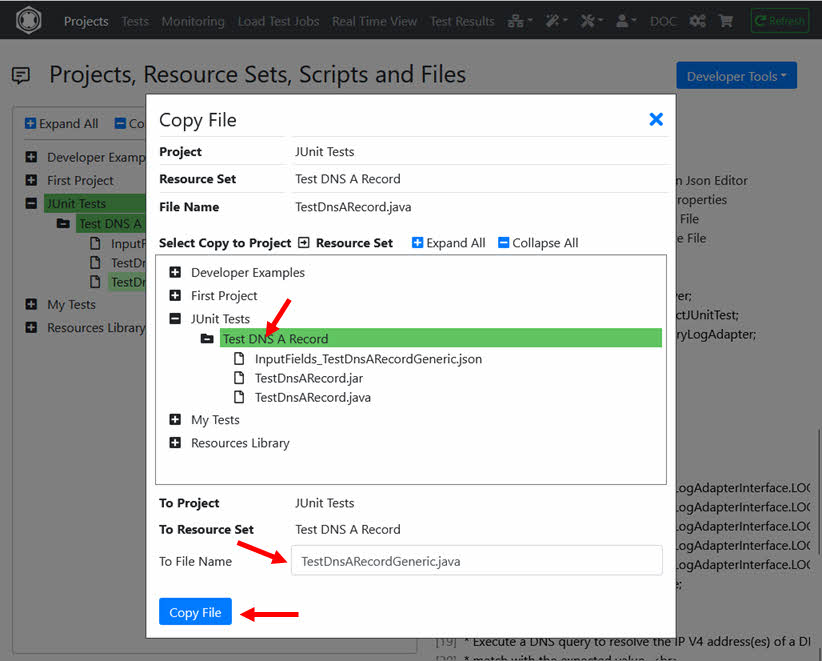
Then copy the file TestDnsARecord.java to TestDnsARecordGeneric.java and then edit TestDnsARecordGeneric.java
At the beginning of the Java class replace the class name and modify the 3 variables:
public class TestDnsARecordGeneric extends AbstractJUnitTest
{
    private String dnsServer;  // example: 8.8.8.8
    private String dnsHostnameToResolve; // example: www.realload.com
    private String expectedIpV4Address; // example: 83.150.39.46
Replace also the class name in the constructor:
    /**
     * Constructor.
     */
    public TestDnsARecordGeneric() {
        // disable DNSJava to search for default DNS servers (DNSJava is integrated in com.dkfqs.tools)
        System.setProperty("dnsjava.noDefaultDnsServers", "true");
    }
And modify the code @Before as follows:
    /**
    * Prepare the test.
    */
    @Before
    public void setUp() {
        if (isArgDebugExecution()) {
            log.setLogLevel(LOG_DEBUG);
        }

        // get the user input fields
        dnsServer = getUserInputField("dnsServer", null);
        if (dnsServer == null) {
            throw new RuntimeException("User input field 'dnsServer' missing");
        }
        dnsHostnameToResolve = getUserInputField("dnsHostnameToResolve", null);
        if (dnsHostnameToResolve == null) {
            throw new RuntimeException("User input field 'dnsHostnameToResolve' missing");
        }
        expectedIpV4Address = getUserInputField("expectedIpV4Address", null);
        if (expectedIpV4Address == null) {
            throw new RuntimeException("User input field 'expectedIpV4Address' missing");
        }

        openAllPurposeInterface();
    }
Then save and compile TestDnsARecordGeneric.java
At ‘Define Test’ turn on the switch InputFields_TestDnsARecordGeneric.json at ‘Additional Required Resource Files’.

Define the Test and the corresponding Load Test Job as usual, and then start the Load Test Job. You can now enter the values for the 3 User Input Fields.
Check the log file users.out after the Load Test Job is completed.
When defining a Monitoring Job, you can also enter the values for the User Input Fields.
7. Conclusion and Prospects
As you have seen, a JUnit Test can be run as both a Load Test Job and a Monitoring Job.
Additionally, a Test Job Template can also be defined from any ‘Load Test Job’, which can then be part of a Test Suite that is executed as Regression Test. This means that you can add multiple JUnit Tests to a Test Suite and execute them in a single run as a Regression Test.
Last but not least, note that JUnit Tests can also be executed with many, up to several thousands, virtual users - for Monitoring Jobs, for Load Tests and for Regression Tests. This is a generic feature of the RealLoad architecture which applies to all kind of RealLoad ‘Tests’.